In the world of electrical engineering, the dry type transformer plays a crucial role in power distribution. Unlike its oil-filled counterparts, a dry type transformer uses air as a cooling medium, making it a safer and more environmentally friendly option. Understanding how to connect cables to a dry type transformer is essential for ensuring efficient and safe operation. This article will guide you through the basics of dry type transformer cable connections, providing insights into wiring methods, cable terminal connections, and installation procedures.

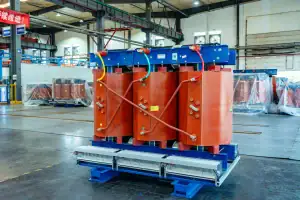
A dry type transformer is a type of transformer that uses air instead of liquid for cooling. These transformers are typically used in indoor settings where fire safety is a concern, such as in commercial buildings, hospitals, and schools. They are known for their reliability, reduced maintenance needs, and eco-friendly nature.
Key Components
- Core: Made of high-grade silicon steel, it reduces energy loss.
- Windings: Copper or aluminum windings are wrapped around the core.
- Insulation: Ensures safety and prevents electrical discharge.
- Enclosure: Protects the components from dust and moisture.
Dry Type Transformer Wiring Methods
Proper wiring methods are critical for the optimal performance of a dry type transformer. Let’s explore some common methods used for transformer wiring.
Star and Delta Connections
The primary and secondary windings of a transformer can be connected in two main ways: star (Y) and delta (Δ).
- Star Connection (Y): One end of each winding is connected to a common point (neutral), forming a Y shape. This method is commonly used for high-voltage applications as it allows for voltage balancing.
- Delta Connection (Δ): The windings are connected in a loop, forming a triangle. Delta connections are typically used for low-voltage applications and provide three-phase loads with a stable power supply.
Transformer Wiring Diagrams

A transformer wiring diagram is a visual representation of the electrical connections and components within a transformer. It helps in understanding the layout and ensuring that all connections are made correctly. When working with dry type transformers, always refer to the manufacturer’s wiring diagram to prevent any mishaps.
Cable Terminal Connection in Dry Type Transformers
The cable terminal connection is a critical aspect of transformer setup, influencing both performance and safety.
Types of Cable Terminals
- Lug Connectors: Used to connect the cable to the terminal block, providing a secure and stable connection.
- Compression Connectors: Offer a reliable connection by compressing the cable end into the terminal.
- Bolted Connectors: Use bolts to secure the cable to the terminal, commonly used in high-voltage applications.
Steps for Cable Terminal Connection
- Prepare the Cable: Strip the insulation from the cable end, ensuring no damage to the conductor.
- Select the Right Connector: Choose a connector that matches the cable size and type.
- Attach the Connector: Secure the connector to the cable using a crimping tool or by bolting.
- Connect to the Terminal: Attach the connector to the transformer’s terminal block, ensuring a tight fit.
High-Voltage Cable Connection

Connecting high-voltage cables to a dry type transformer requires careful attention to detail. Follow these steps for a safe and efficient high-voltage cable connection:
- Safety First: Always ensure the transformer is de-energized before making any connections.
- Use the Right Tools: Use insulated tools to prevent accidental electrical contact.
- Proper Insulation: Ensure that all connections are properly insulated to avoid electrical hazards.
- Secure Connections: Tighten all connections to prevent loose wiring that could lead to arcing or overheating.
Transformer Cable Installation
The installation of transformer cables is a multi-step process that requires precision and attention to detail.
Step-by-Step Installation Process
- Site Preparation: Ensure the area is clean and free from obstructions.
- Cable Routing: Plan the cable route to avoid sharp bends and minimize tension.
- Support and Protection: Use cable trays or conduits to support and protect the cables.
- Connect to Transformer: Follow the manufacturer’s guidelines for connecting cables to the transformer.
- Testing and Inspection: After installation, conduct thorough testing to ensure all connections are secure and the transformer operates correctly.
Common Challenges and Solutions
Challenge: Overheating
- Solution: Ensure proper ventilation around the transformer and check for loose connections that may cause excessive heat.
Challenge: Electrical Arcing
- Solution: Verify that all connections are tight and that insulation is intact to prevent arcing.
Challenge: Noise and Vibration
- Solution: Install vibration dampers and ensure the transformer is placed on a stable surface.
Conclusion
Understanding dry type transformer cable connections is vital for any electrical engineer or technician involved in power distribution. By following the outlined wiring methods, cable terminal connections, and installation steps, you can ensure the safe and efficient operation of your transformer. Always prioritize safety and refer to the manufacturer’s guidelines to prevent any accidents or equipment failures.
With the right knowledge and tools, mastering dry type transformer connections becomes an achievable task, enhancing both performance and longevity of your electrical systems.